Setting Up a Virtual Machine with SparkR
Dec 8, 2014 · 10 minute read · CommentsIt is fairly safe to say that at this point that Spark is the heir apparent standard for advanced analytics applications on big data. As things stand, it is a relatively friendly environment for data scientists and analysts whose preferred languages are Scala, Python, or Java. In contrast, support for the R language, arguably the most commonly used open source language for advanced analytics, is in its comparative infancy in the Spark environment. However, active development, aimed at making the R language a “first class citizen” in Spark, is under way as part of the SparkR Project.
Setting up a system to do development as part of contributing to the SparkR project, or to easily experiment with SparkR, is a task that involves a bit of effort (there are fair number of prerequisites for building SparkR). Rather than creating a SparkR ready environment directly on your own computer, an easier approach is to start with a virtual machine that has many of the prerequisites already installed, and then customize it by installing the remaining software. In this post, I provide a recipe for doing so, using Cloudera’s CDH 5.2 Quick Start VM for Oracle’s VirtualBox virtualization software package. The Cloudera Quick Start VM comes with much of the needed software installed (Spark with SparkSQL, Hadoop, Maven, Git, and Java), it also comes with R, but not the most recent release R as of early December 2014 (the VM was released shortly before the release of R version 3.1.2, so it comes with R 3.1.1). I’ve written a shell script to automate most of the task of installing the most recent version of R, which also installs R’s rJava package(currently needed for SparkR) and the rServe package (needed for Alteryx’s SparkR development team’s work). The script also installs Scala (version 2.10.4) for option value.
In what follows, I first describe how to: get setup the VirtualBox Cloudera Quick Start VM, install and configuring the remaining need software, and configure Git and install SparkR. Hopefully this post will enable you to get up and running with SparkR quickly.
Getting Started with the Cloudera Quick Start VM
The first thing that needs to be done is to prepare the VM. If you are familiar with working with VirtualBox VM’s, you can skip over much of this section. The following steps provide a recipe for getting the VM ready for the installation of additional needed software:
- Download the Quick Start VM from Cloudera. The VM uses Centos 6.2, and appears to have been created with VirtualBox 4.3.10, which is an older version of VirtualBox (this version was released back in March, while the current version of VirtualBox is 4.3.20), and this difference in versions has some implications for preparing the VM. The password for the VM is “cloudera” and can be used for superuser authentication as well.
- The Quick Start VM comes as a 7-zip archive, and you will need to unzip the archive to proceed. To do this, you will need to have 7-zip available. 7-zip is open source, and versions can be downloaded for all major operating systems. The archive consists of a folder (cloudera-quickstart-vm-5.2.0-0-virtualbox) that contains two files.
- If you do not already have VirtualBox, and your operating system is not Windows 7 download and install it. There are binary installers/packages for Windows, OS X, Solaris, and all major Linux distributions available. If you are on Windows 7, the most recent version of VirtualBox may well work (the most recent version does on my Win 7 machine), but we (and many other VirtualBox users) have encountered Win 7 machines where recent versions of VirtualBox cannot load a VM. The VirtualBox site does maintain an archive of older VirtualBox releases. Locally we have found that prior versions as recent as the 4.3.12 release do not exhibit the problem.
- Load the Cloudera VM into VirtualBox by using the VirtualBox pull-down menu option File > Import Appliance… and then navigate to the cloudera-quickstart-vm-5.2.0-0-virtualbox folder, where you will be able to select the file cloudera-quickstart-vm-5.2.0-0-virtualbox.ovf (the only visible file) and begin importing the VM.
- Once the VM has been imported, highlight the “cloudera-quickstart-vm-5.2.0-0-virtualbox VM and press the green start button to launch it. This initial launch of the VM is done just to make sure all is well with the initial setup. Assuming you are on Win 7, and installed VirtualBox 4.3.20, and see the error message in Figure 1, you will need to install an older version of VirtualBox.
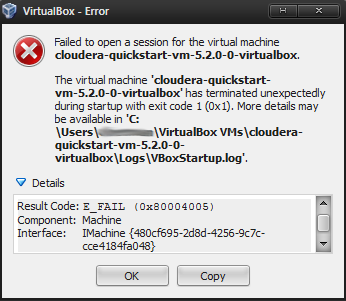
Figure 1
- When the VM has loaded you will want to sync the VM’s “Guest Additions” to the version of VirtualBox you are using. To do this, use VirtualBox’s pull-down menu option Devices > Insert Guest Additions CD image…, which is illustrated in Figure 2. What you are likely thinking at the moment is “I don’t have a Guest Additions CD!”, don’t worry, you have a virtual copy of it. When you select this option a dialog box will pop-up indicating “That you have just inserted a medium…”, press the OK button, without changing any of the options, which will result in another dialog box appearing. Press the OK button in the second dialog box, which will bring up a third (and final) dialog box, into which you want to enter “cloudera” as the root password and press the Authenticate button. A terminal window will appear to start the update process, when the process is complete, click on the terminal window to make it active and press the Enter key on your keyboard to close the window.
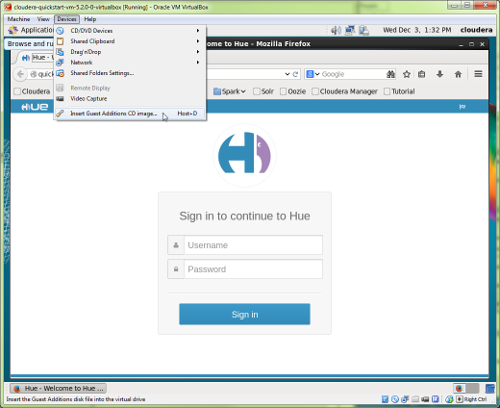
Figure 2
- One important benefit to sync the VM’s Guest Additions to the version of VirtualBox you are using is that you can take advantage of a shared, bidirectional clipboard that will enable you to copy and paste between your machine and the VM. One immediate benefit is you will be able to copy commands from these instructions and paste them into a terminal window on the VM. To enable the bidirectional clipboard, use VirtualBox’s pull-down menu option Devices > Shared Clipboard > Bidirectional. You can also enable bidirectional drag and drop via the Drag’n’Drop options of the Devices menu.
- At this point you will want to shutdown the VM using VirtualBox’s pull-down menu option Machine > ACPI Shutdown (illustrated in Figure 3).
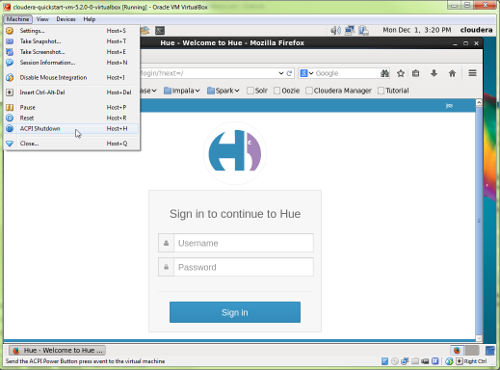
Figure 3
- After the VM has shutdown, you need to alter the VM in VirtualBox, both to give it the resources that will likely be needed for SparkR development, and to enable the VM to directly connect to the Internet. One potential issue here is we are increasing the VM’s RAM from 4 GB to 6 GB. As a result, your computer should have at least 8 GB of memory, and preferably more, since VirtualBox will immediately grab 6 GB of memory from your computer when the VM is launched. The steps needed to prepare the VM are:
- Click on the cloudera-quickstart-vm-5.2.0-0-virtualbox icon to highlight the VM.
- Under System > Motherboard increase the base memory to 6144 MB.
- Under System > Processor increase the processor(s) from 1 to 2 CPUs.
- If you will want to access this VM from other machines within you local area network, then under Network > Adapter 1 change the “Attached Adapter” to “Bridged Adapter”.
- Start the VM again.
Installing and Configuring the Additional Software
As indicated in the introduction, the installation of R and Scala is a fairly automated process done through a shell script. The script itself is fairly well commented, and you probably want to take a look at it prior to running it in order to get a sense of what it is doing. While running the script to install the software involves a single user command, configuring everything is a bit more involved, but fairly straight forward. Here are the steps: - Open a terminal window (press the console icon on the upper task bar of the vm) - We will use the wget utility to download the installation script via the terminal command line interface by entering the command
wget http://adventures.putler.org/SparkR_prep-0.1.sh
- Once the script has downloaded, issue the command below at the terminal prompt to start the installation process.
sudo sh SparkR_prep-0.1.sh
- You will be prompted once during the installation process to OK the installation of the dependencies required to build R from source. Figure 2 shows this prompt, at the prompt type the letter “y” followed by enter.
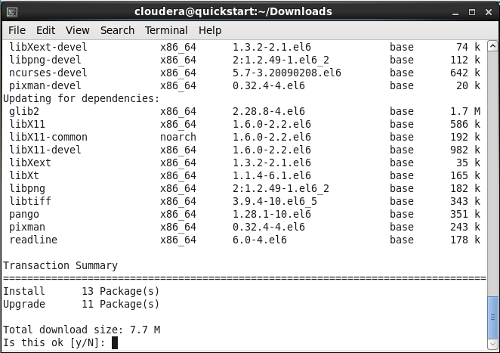
Figure 4
- After the script is run, Scala needs to be permanently added to the user cloudera’s path. To do this, cloudera’s .bash_profile file. The instructions use gedit to do this, but all the common Unix/Linux text editors (VI, nano, EMACS) are installed on the VM. To start editing the file, use the following command
gedit .bash_profile
- The lines that need to be added/altered are after the “User specific environment and startup programs” comment, and are given below. When you are done editing, the .bash_profile file should look like the one shown in Figure 3. Once it does, save the file and close gedit.
export SCALA_HOME=/usr/local/share/scala

PATH=$PATH:$HOME/bin:$SCALA_HOME/bin

export PATH
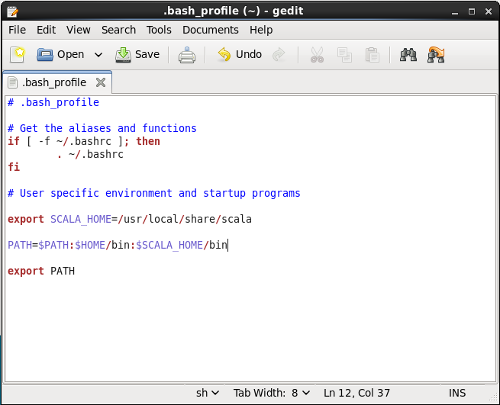
Figure 5
- The last thing that needs to be done with respect to software installation and configuration is to have the environment variable changes recognized by the operating system. To do this, enter the command below at the terminal command line
source .bash_profile
Configuring Git and Building SparkR
The SparkR Project is hosted on GitHub. If you want to contribute to SparkR, you will need a GitHub account. In addition, the project has both a dedicated JIRA and a devloper’s mailing list on Google Groups. In this blog I only cover project infrastructure as it relates to GitHub. In what follows, it is assumed that you have a GitHub account.
- We start by configuring Git on the Quick Start VM (the VM comes with the Git client pre-installed) by entering the commands below in a terminal window. You will want to replace
<handle or name>with your own handle (mine is dputler) or name, and<email address>with your own email address. The handle/name and email address values need to be in quotes. The last two commands increase the amount of time you can interact with a GitHub repository before you need to re-authenticate.
git config --global user.name "<handle or name>"
git config --global user.email "<email address>"
git config --global credential.helper cache
git config --global credential.helper 'cache --timeout=3600'
- Instead of developing against the main repository, the SparkR project uses what is known as a “fork & pull” collaboration model whereby a developer makes changes to a personal fork of the project, and then makes a pull request to have those changes integrated into the main repository. As a result, we are going to make a fork of the SparkR project. To do this, go to the SparkR GitHub repository at https://github.com/amplab-extras/SparkR-pkg and click on the Fork button, which is shown (boxed in red) in Figure 4. Pressing this button will result in a fork of SparkR being linked to your GitHub account. The URL for you personal copy of SparkR should be
https://github.com/<your GitHub user ID>/SparkR-pkg, where<your GitHub user ID>is your actual GitHub user ID.
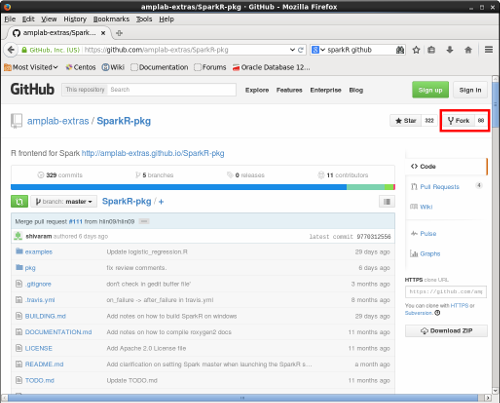
Figure 6
- The next step of the process is to “clone” (create a local copy on the VM) and build SparkR from your forked version of the repository. The terminal commands below will allow you to do this (you will need to replace
<your GitHub user ID>with your actual ID).
git clone https://github.com/<your GitHub user ID>/SparkR-pkg
cd SparkR-pkg
SPARK_HADOOP_VERSION=2.5.0-mr1-cdh5.2.0 ./install-dev.sh
- We need to properly connect Java and R together at this point, which is accomplished with the command
sudo -E R CMD javareconf
- At this point you hopefully have a successful build of SparkR, which you can begin to explore by bringing up the SparkR console (shown in Figure 7) via the command:
./sparkR
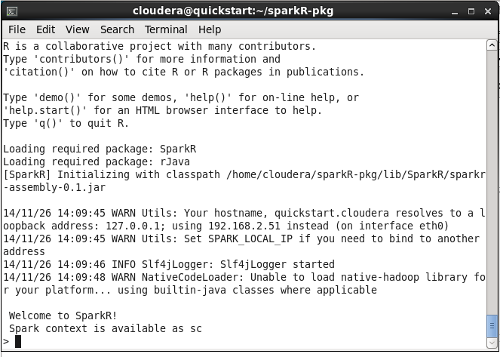
Figure 7
- Once you are done exploring SparkR, you can again use the VirtualBox pull-down menu option Machine > ACPI Shutdown to shutdown your SparkR development VM.
